

Azure Entra ID SSO - SAML
This guide covers setting up SAML-based SSO with Azure Entra ID using Enterprise Applications.
Prerequisites
Section titled “Prerequisites”✅ Organization Admin Account: You must be logged in as an organization admin
✅ Azure Entra ID Admin Access: You need administrator access to your organization’s Azure Entra ID
Phase 1: Azure Entra ID Enterprise Application
Section titled “Phase 1: Azure Entra ID Enterprise Application”Step 1: Create Enterprise Application
Section titled “Step 1: Create Enterprise Application”- Sign into Azure Portal
- Go to portal.azure.com
- Navigate to Azure Active Directory → Enterprise applications
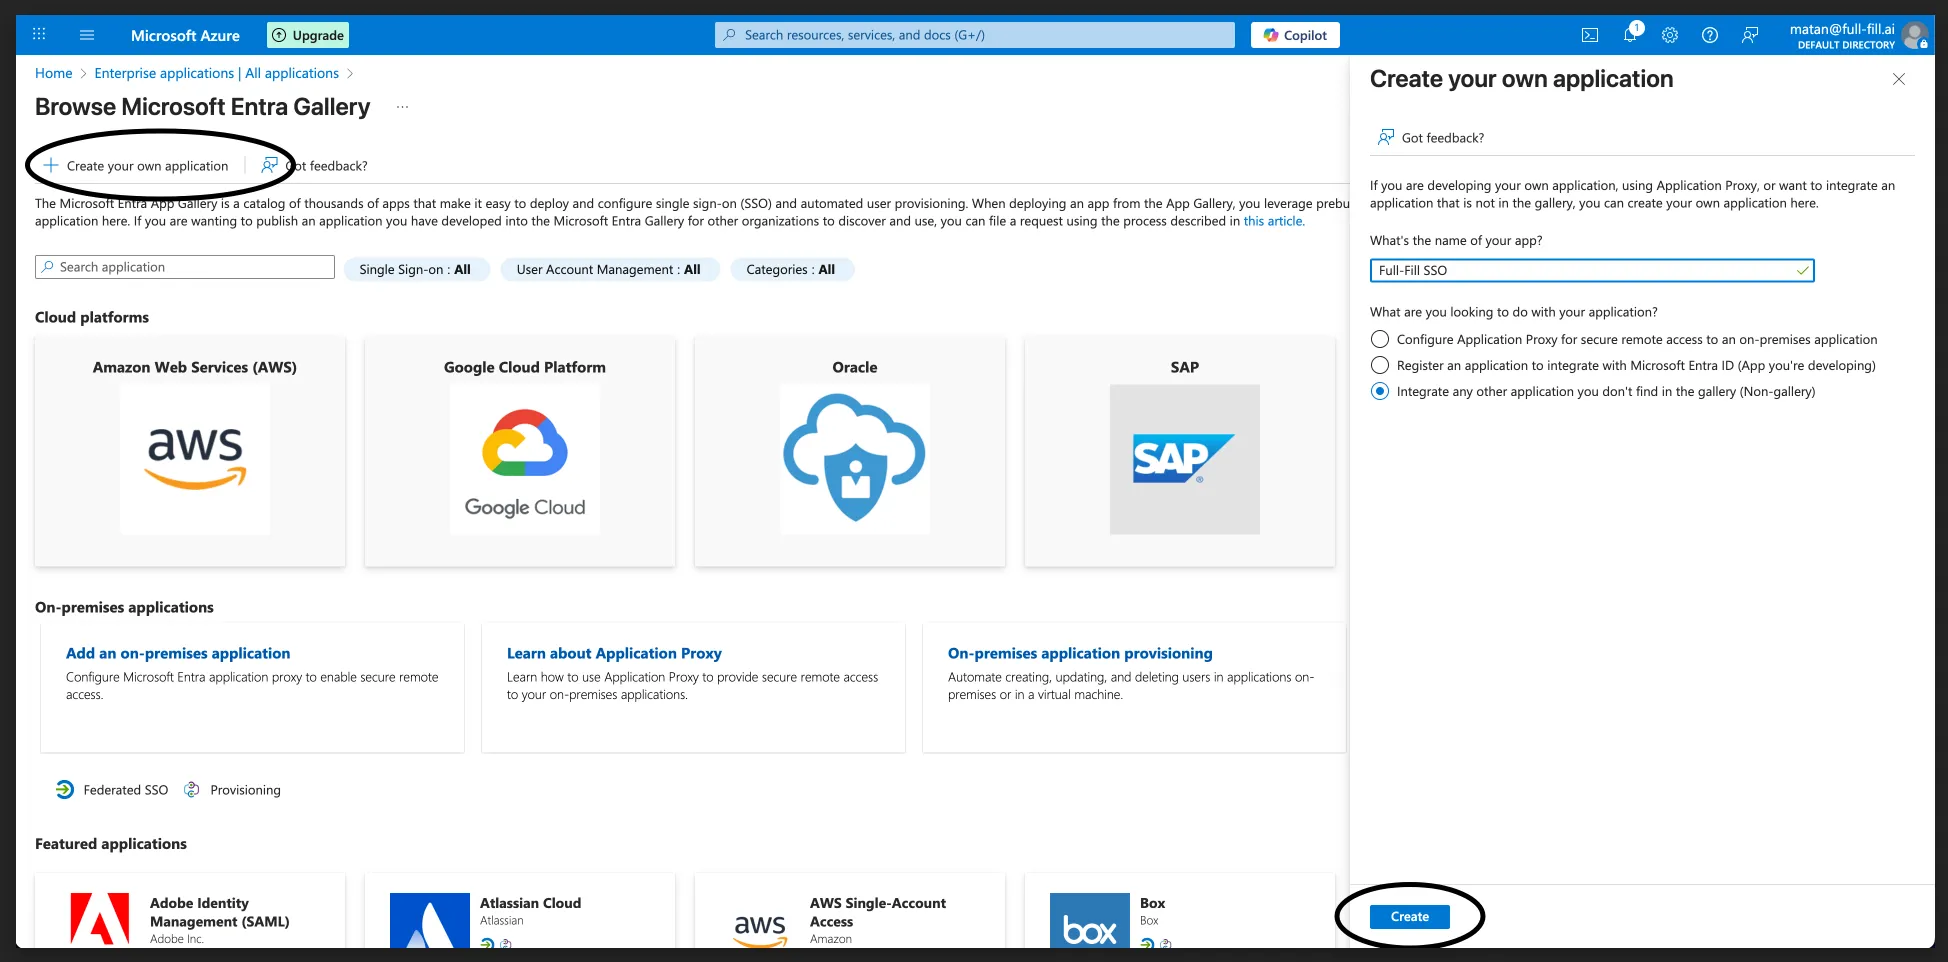
- Create New Application
- Click “New application”
- Click “Create your own application”
- Name: Full-Fill SSO (or your preferred name)
- Select: “Integrate any other application you don’t find in the gallery (Non-gallery)”
- Click “Create”
Step 2: Configure Single Sign-On
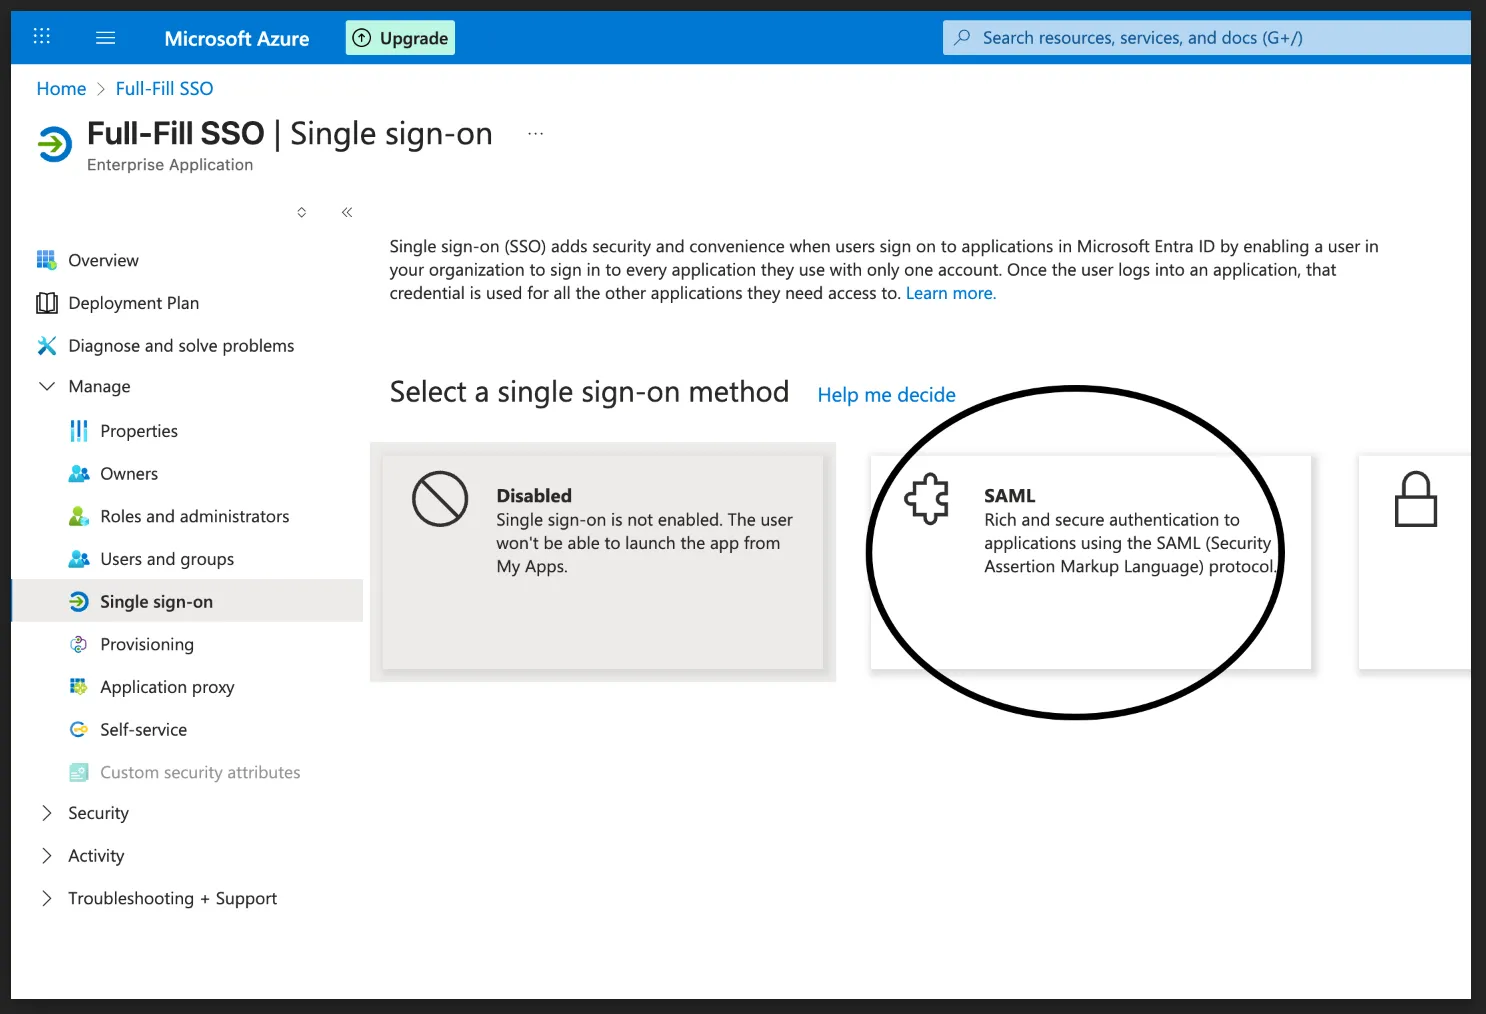
Section titled “Step 2: Configure Single Sign-On”- In your new Enterprise Application, click “Single sign-on” in the left sidebar
- Select “SAML” as the single sign-on method
Step 3: Get Full-Fill Configuration URLs
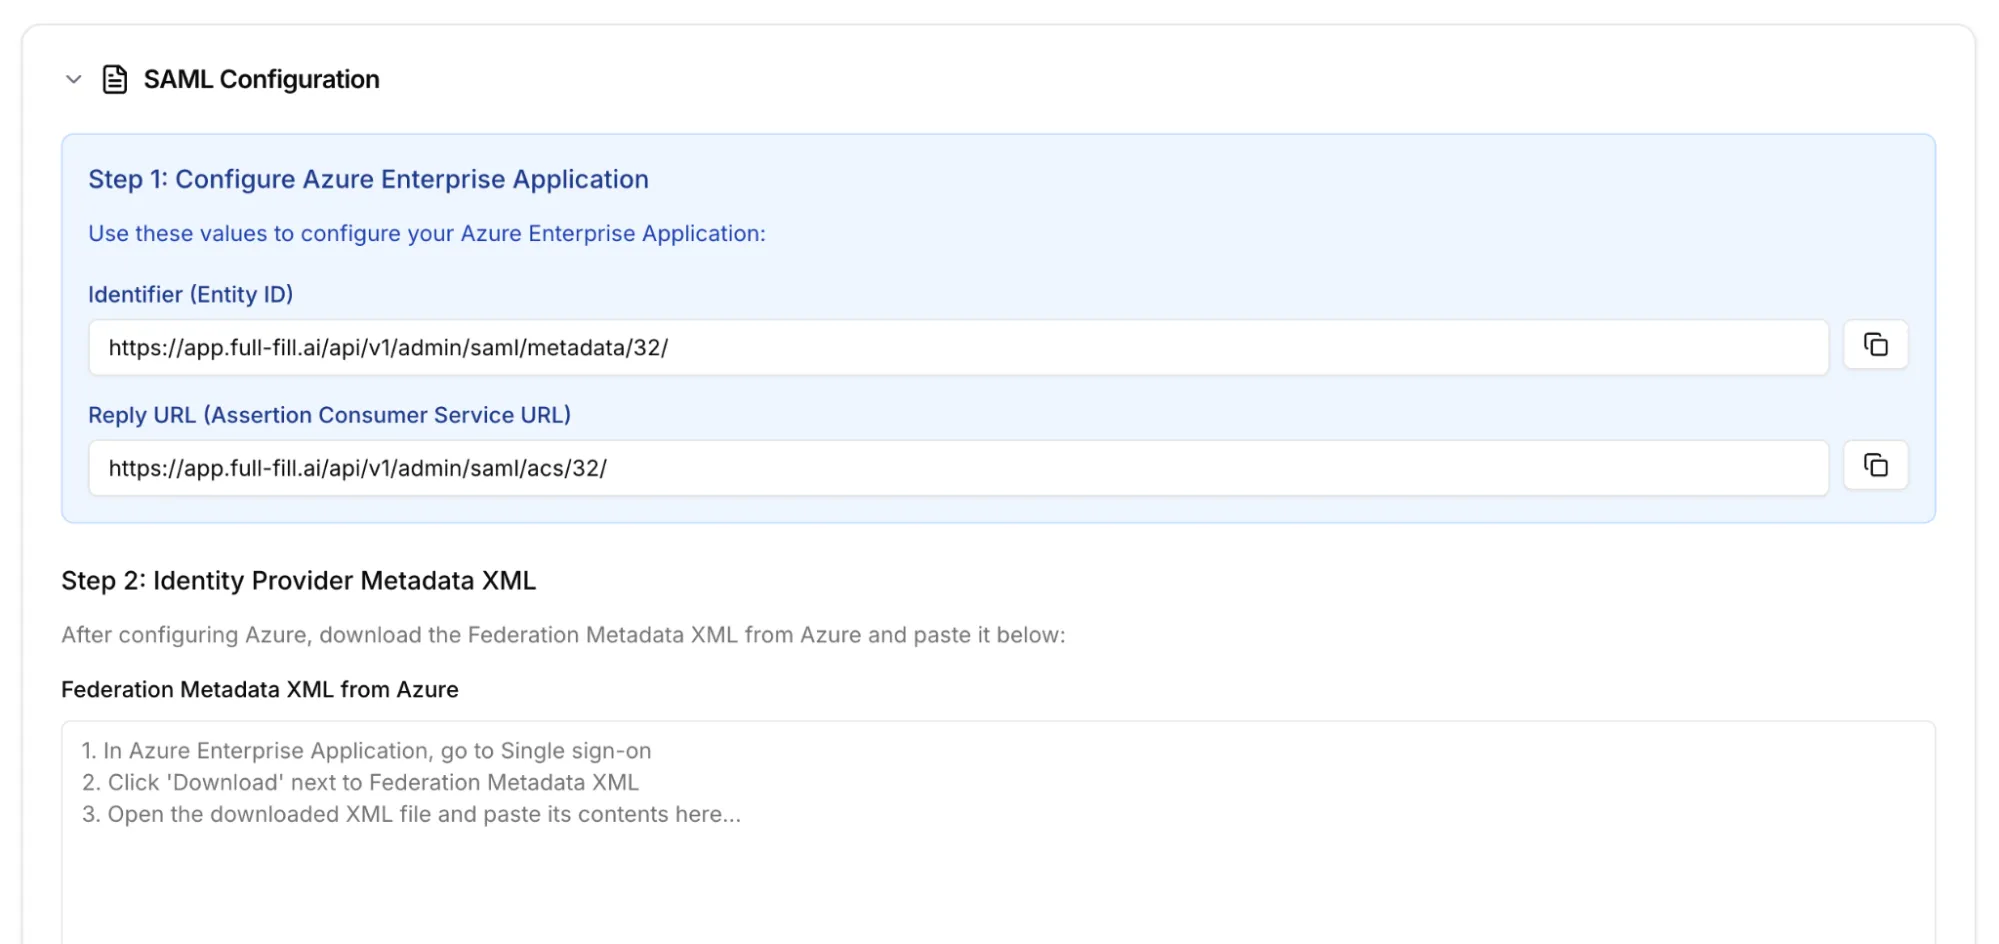
Section titled “Step 3: Get Full-Fill Configuration URLs”- Log into Full-Fill as an organization admin
- Go to Settings → SSO Configuration
- Set SSO Provider to “Microsoft SAML”
- Copy these URLs that appear (you’ll need them for Azure):
- Identifier (Entity ID)
- Reply URL (Assertion Consumer Service URL)
⚠️ Important: Keep these URLs handy - you’ll paste them into Azure in the next step.
Step 4: Configure Basic SAML Configuration in Azure
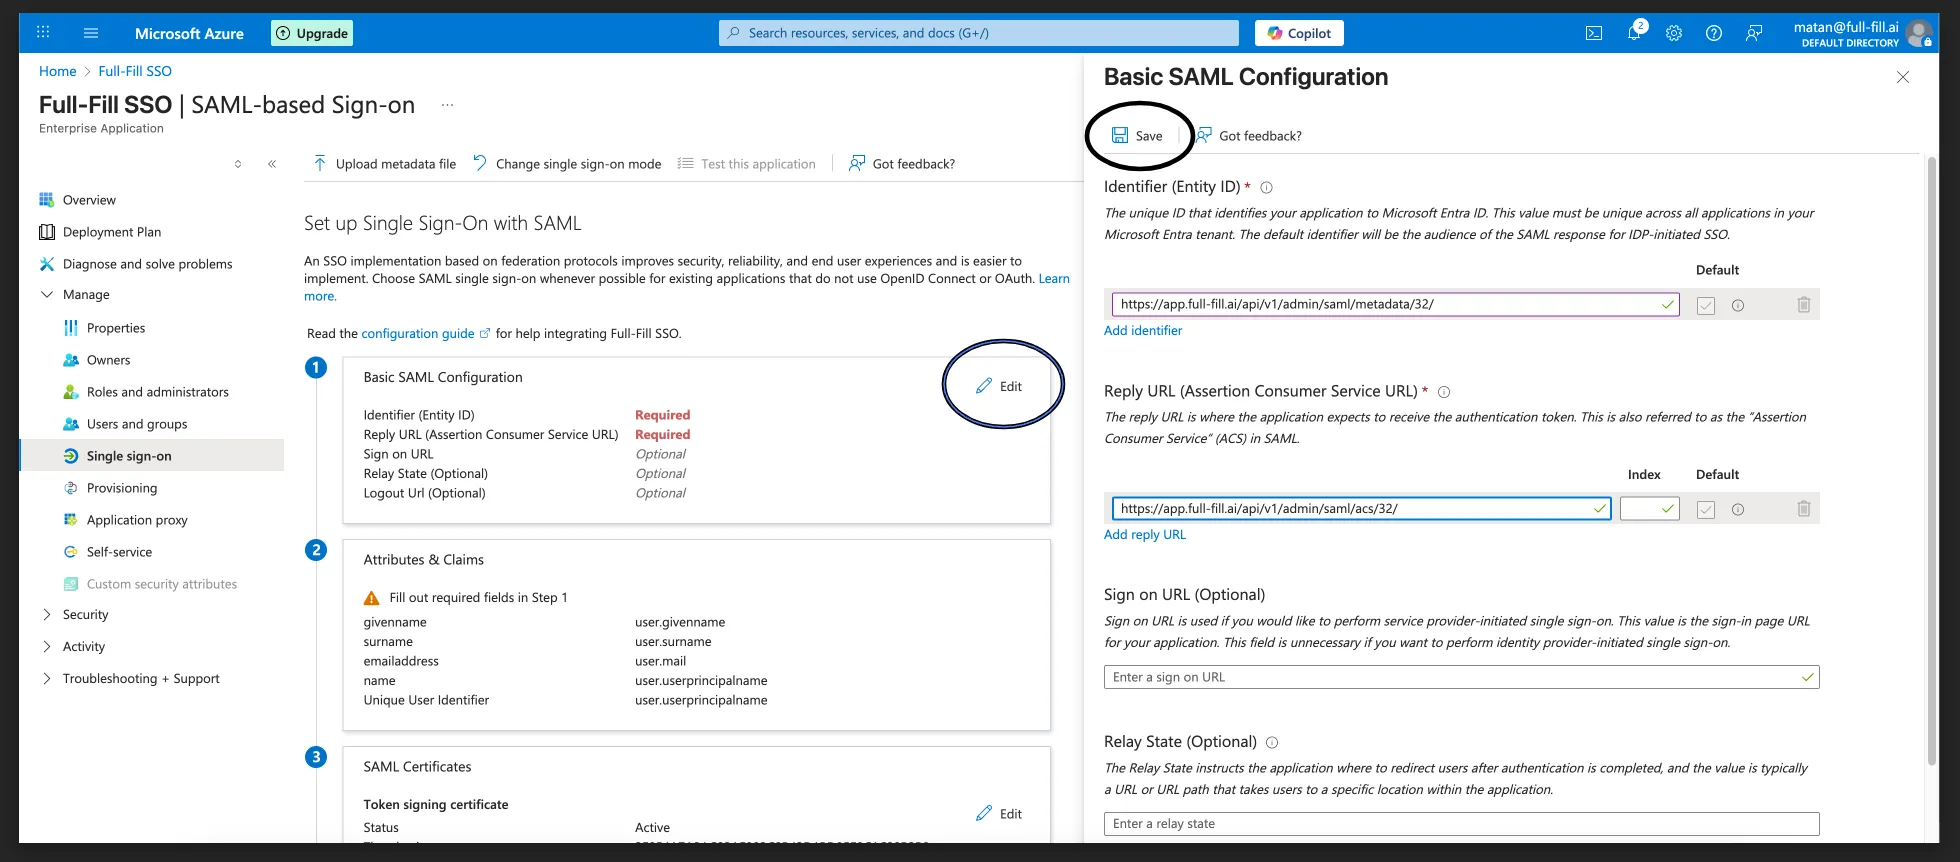
Section titled “Step 4: Configure Basic SAML Configuration in Azure”- Back in Azure, in the SAML configuration page
- In Section 1 (Basic SAML Configuration), click “Edit”
- Manually enter the Full-Fill URLs:
- Identifier (Entity ID): Paste the Entity ID from Full-Fill
- Reply URL (Assertion Consumer Service URL): Paste the Reply URL from Full-Fill
- Click “Save”
Step 5: Download Identity Provider Metadata
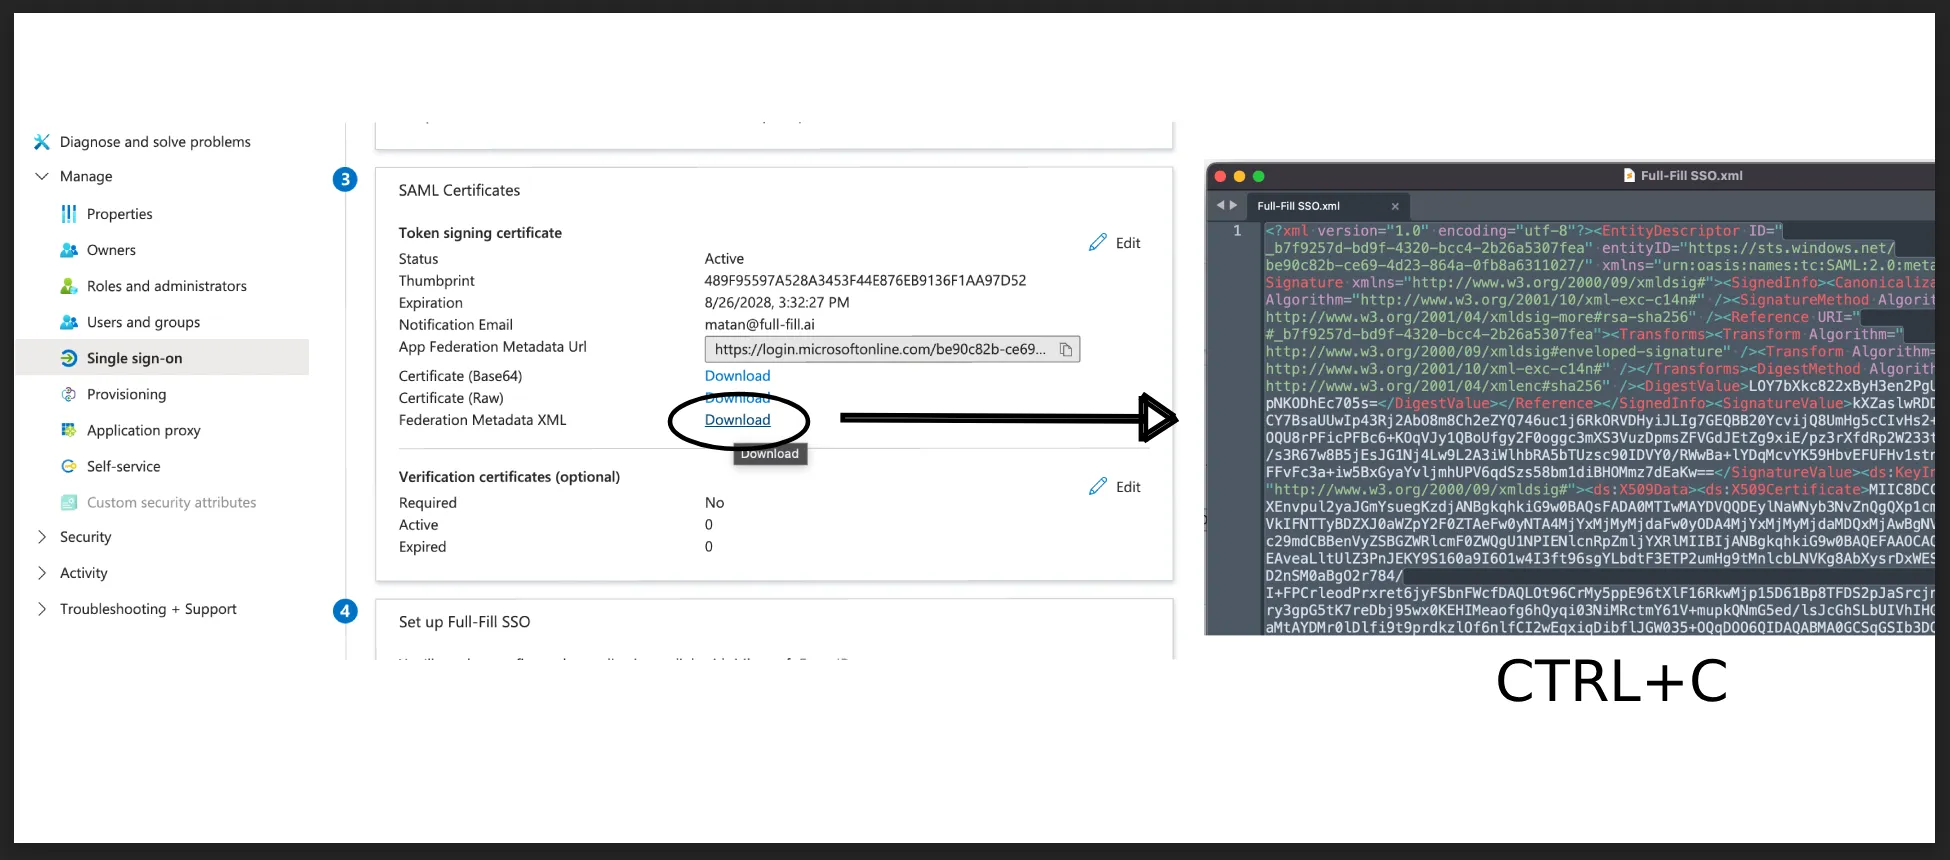
Section titled “Step 5: Download Identity Provider Metadata”- In Section 3 (SAML Signing Certificate)
- Click “Download” next to “Federation Metadata XML”
- Save this file & Copy the content
Phase 2: Full-Fill SAML Configuration
Section titled “Phase 2: Full-Fill SAML Configuration”Step 6: Upload Azure Metadata to Full-Fill
Section titled “Step 6: Upload Azure Metadata to Full-Fill”- In Full-Fill Settings → SSO Configuration
- In the SAML Configuration section:
- Paste the Azure metadata XML you downloaded in Step 5
- The XML should start with <EntityDescriptor…
- Click “Update SAML configuration”
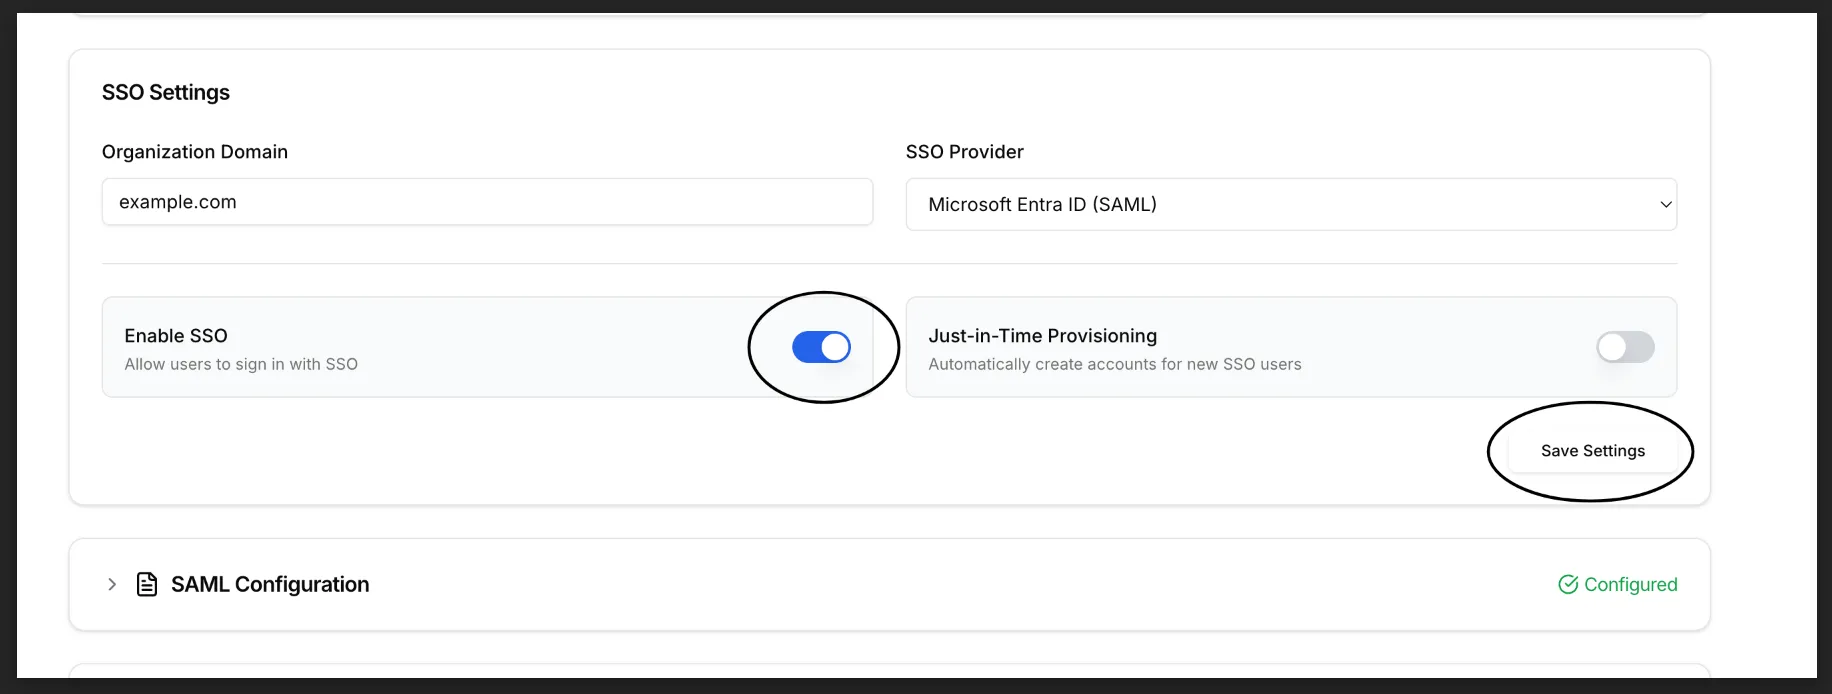
- Configure basic SSO settings:
- Organization Domain: your-company.com
- Enable SSO: Turn on the toggle
- Click “Save All Settings”
Phase 3: Azure User Assignment
Section titled “Phase 3: Azure User Assignment”Step 7: Assign Users and Groups (unless configuring SCIM provisioning)
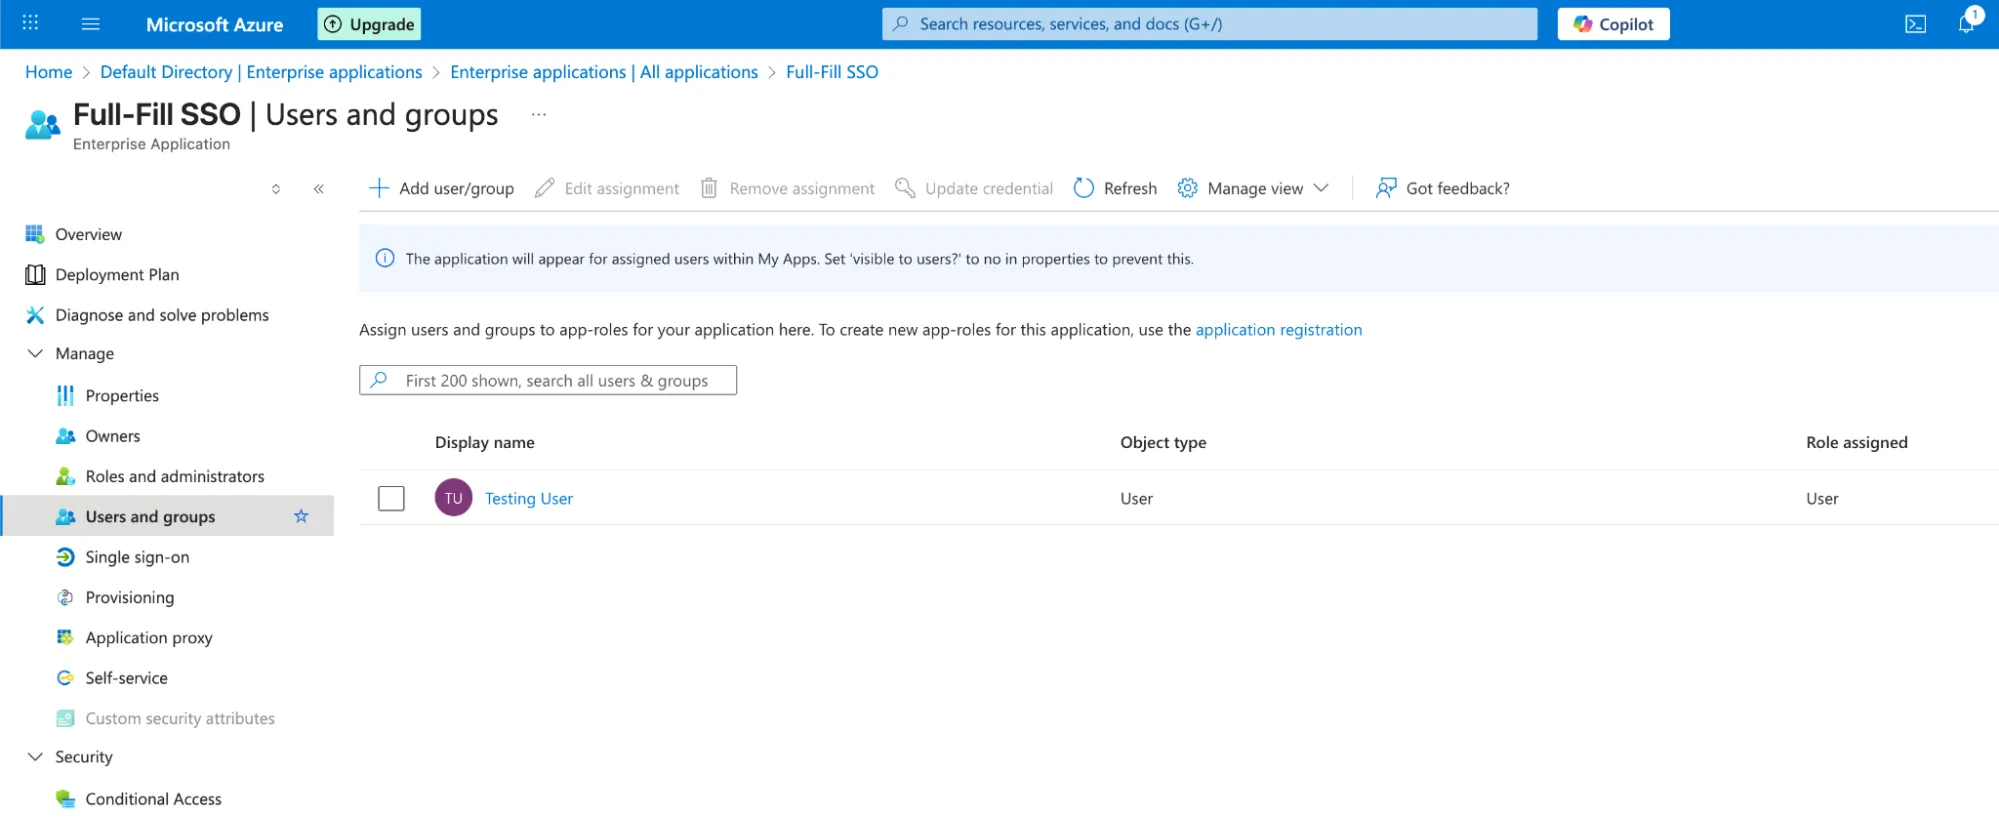
Section titled “Step 7: Assign Users and Groups (unless configuring SCIM provisioning)”- Back in Azure Enterprise Application
- Click “Users and groups” in the left sidebar
- Click “Add user/group”
- Select users or groups who should have access to Full-Fill
- Click “Assign”
⚠️ Important: Only assigned users can access Full-Fill via SAML SSO.
Phase 4: Testing and Rollout
Section titled “Phase 4: Testing and Rollout”Step 8: Test SAML SSO
Section titled “Step 8: Test SAML SSO”- In Azure Enterprise Application, click “Single sign-on”
- Click “Test” at the bottom of the SAML configuration
- OR manually test:
- Open incognito browser
- Go to Full-Fill login page
- Enter email from your organization domain
- Should redirect to Azure SAML login
Step 9: Verify SAML Response
Section titled “Step 9: Verify SAML Response”If test succeeds, you should see:
- ✅ Successful redirect to Azure login
- ✅ User authentication in Azure
- ✅ SAML assertion sent to Full-Fill
- ✅ User logged into Full-Fill
If test fails:
- Check metadata XML was uploaded correctly in both directions
- Verify user is assigned to the Azure Enterprise Application
- Check Full-Fill domain matches user’s email domain