

Azure Entra ID SCIM Provisioning
This guide covers setting up SCIM 2.0 automatic user provisioning with Azure Entra ID. SCIM automatically syncs users from Azure AD to Full-Fill, eliminating manual user management.
SCIM provides automatic (Users Only):
- ✅ User creation when users are assigned in Azure AD
- ✅ User updates when profiles change in Azure AD
- ✅ User deactivation when users are unassigned or disabled
- ℹ️ Groups are not provisioned in the current version
- ✅ Real-time synchronization of user lifecycle events
Prerequisites:
-
⚠️ Azure SSO must be configured first
Section titled “⚠️ Azure SSO must be configured first”
Phase 1: Full-Fill SCIM Configuration
Section titled “Phase 1: Full-Fill SCIM Configuration”- Log into Full-Fill as an organization admin
- Go to Settings → SSO Configuration
- In the SCIM Provisioning section:
- Turn on “Enable SCIM Provisioning”
- Click “Generate Token” to create a new bearer token
- Copy the SCIM Base URL
- Copy the Bearer Token (keep this secure!)
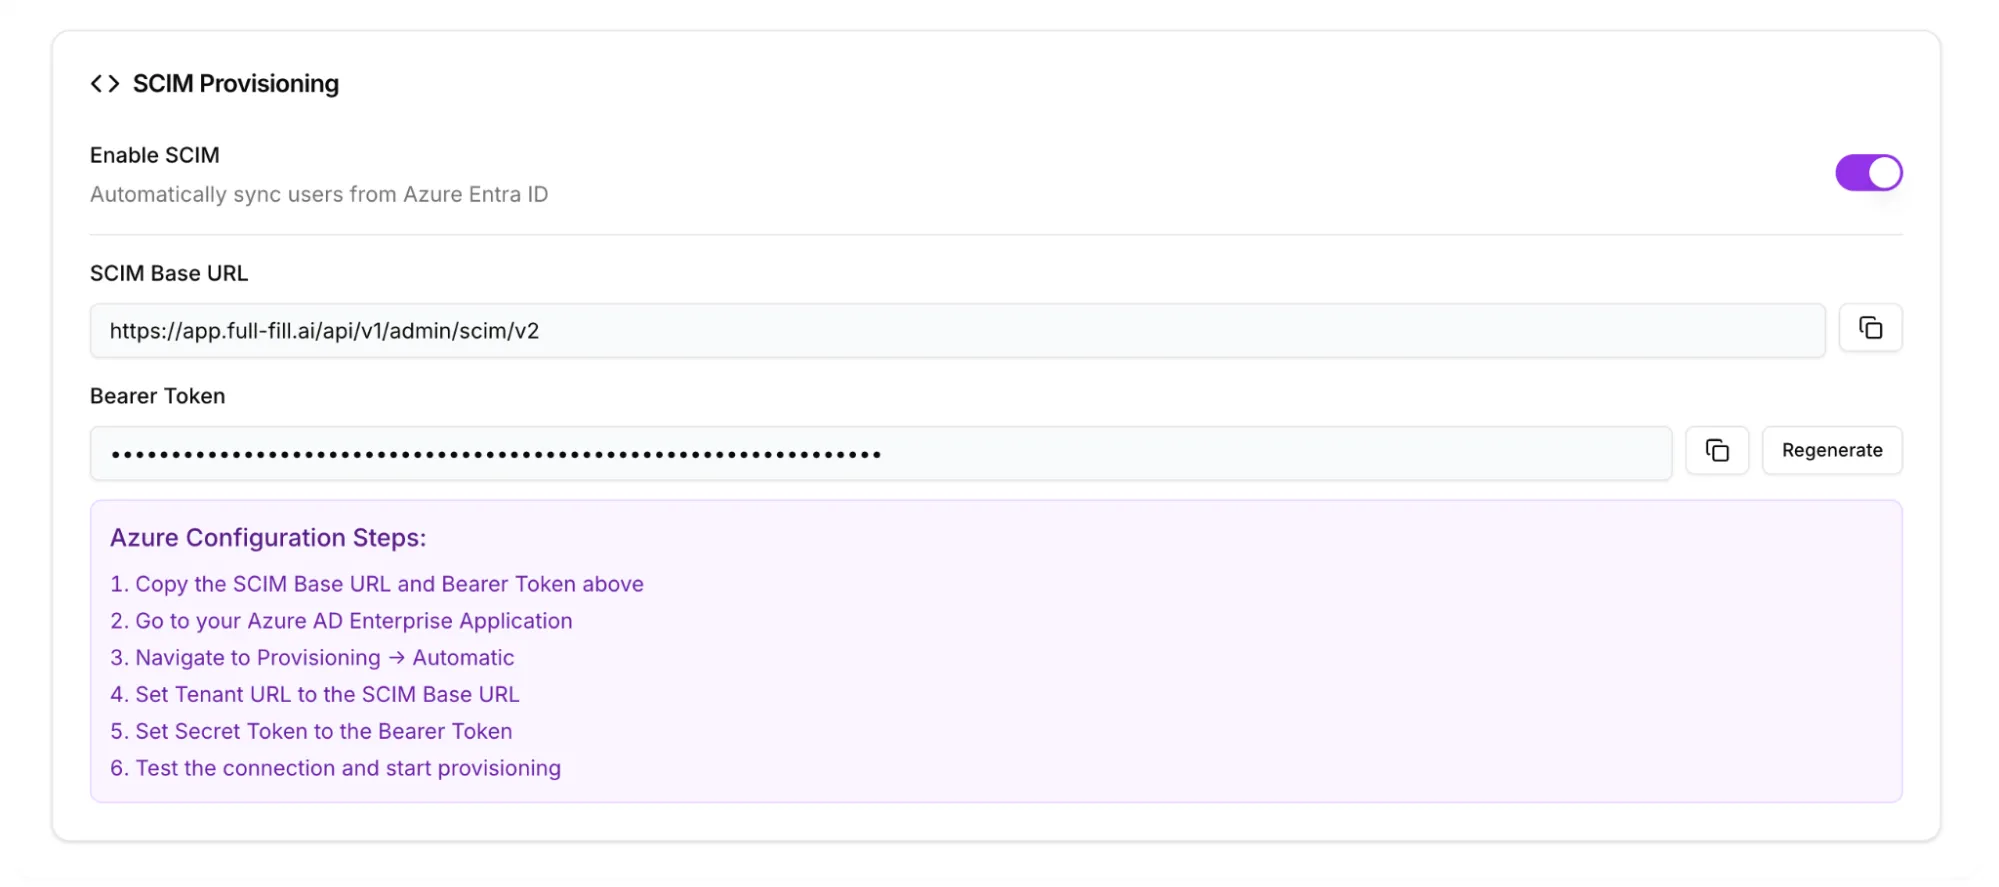
⚠️ Important: Keep the bearer token secure - it provides administrative access to user management.
Phase 2: Azure Entra ID Provisioning Setup
Section titled “Phase 2: Azure Entra ID Provisioning Setup”Access Enterprise Application
Section titled “Access Enterprise Application”- Sign into Azure Portal
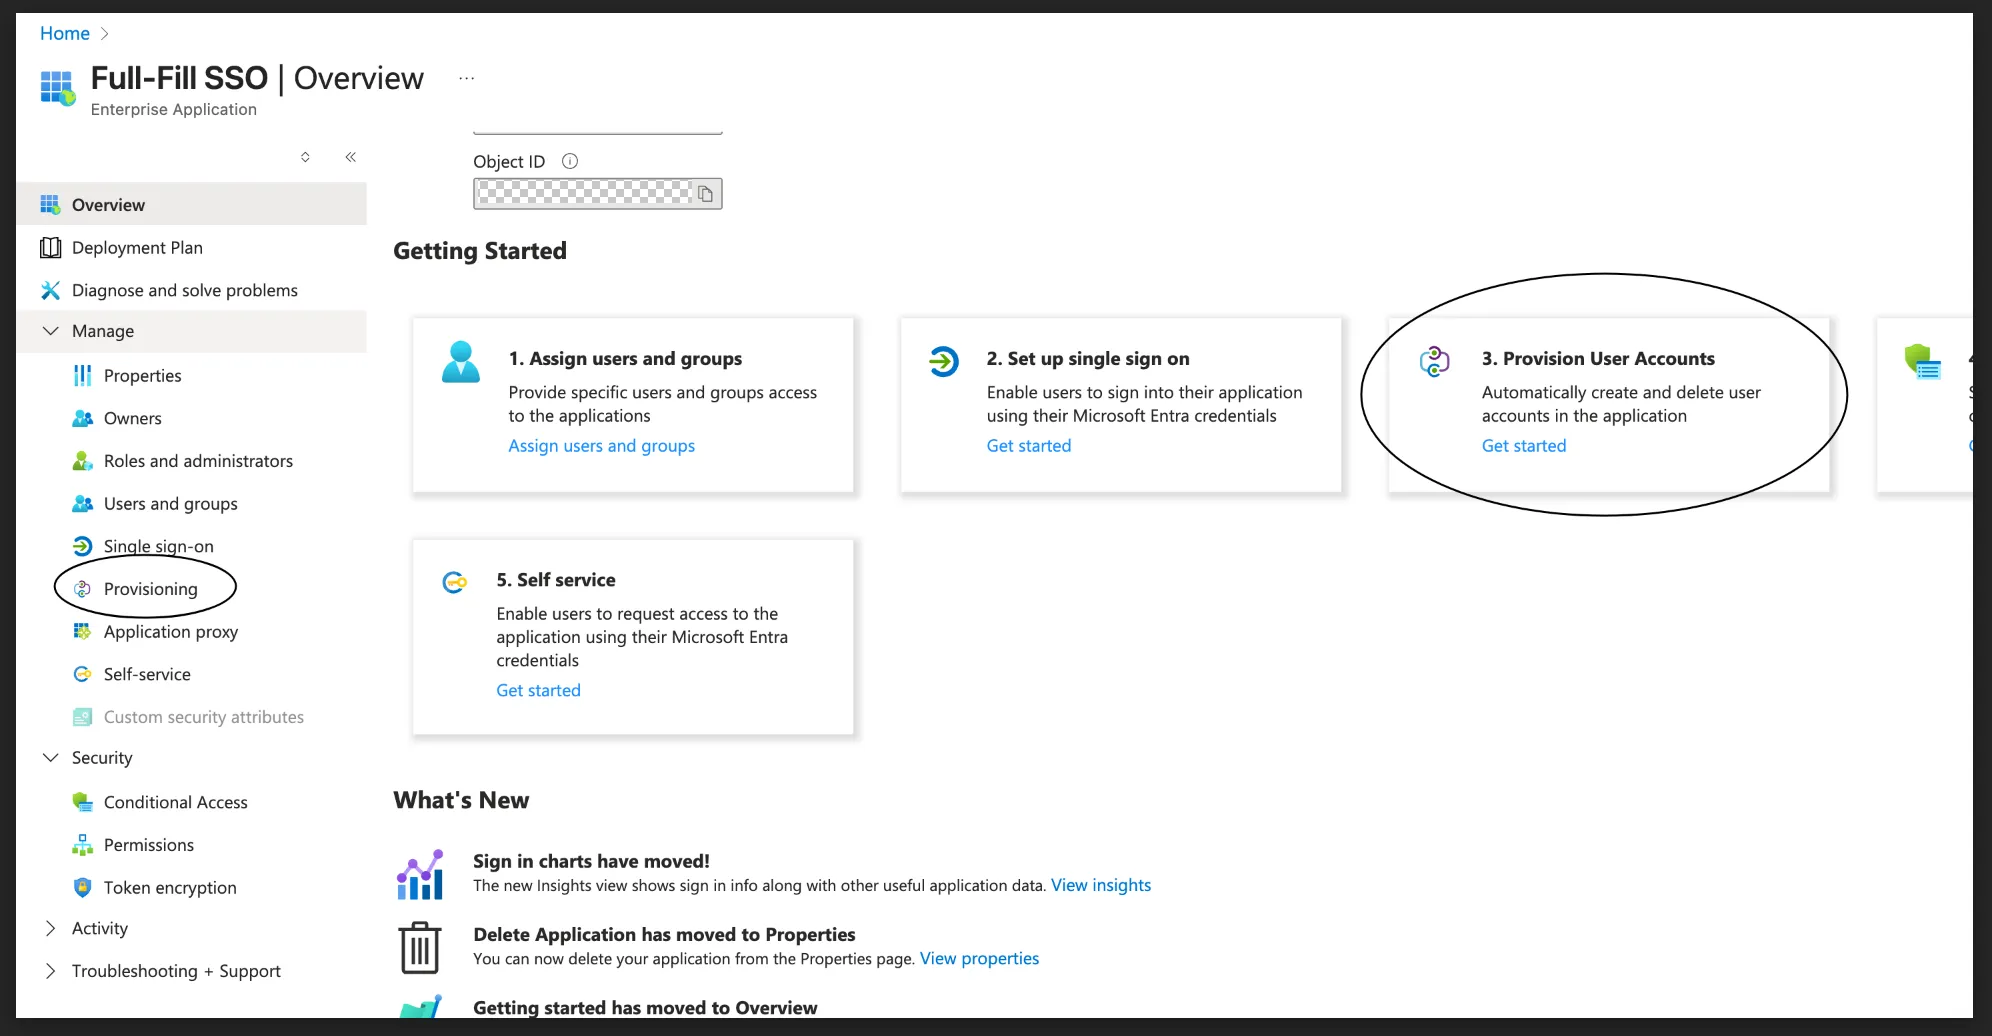
- Go to Azure Active Directory → Enterprise applications
- Find your Full-Fill application (created during SSO setup)
- Click on the application
Configure Automatic Provisioning
Section titled “Configure Automatic Provisioning”- In the left sidebar, click “Provisioning”
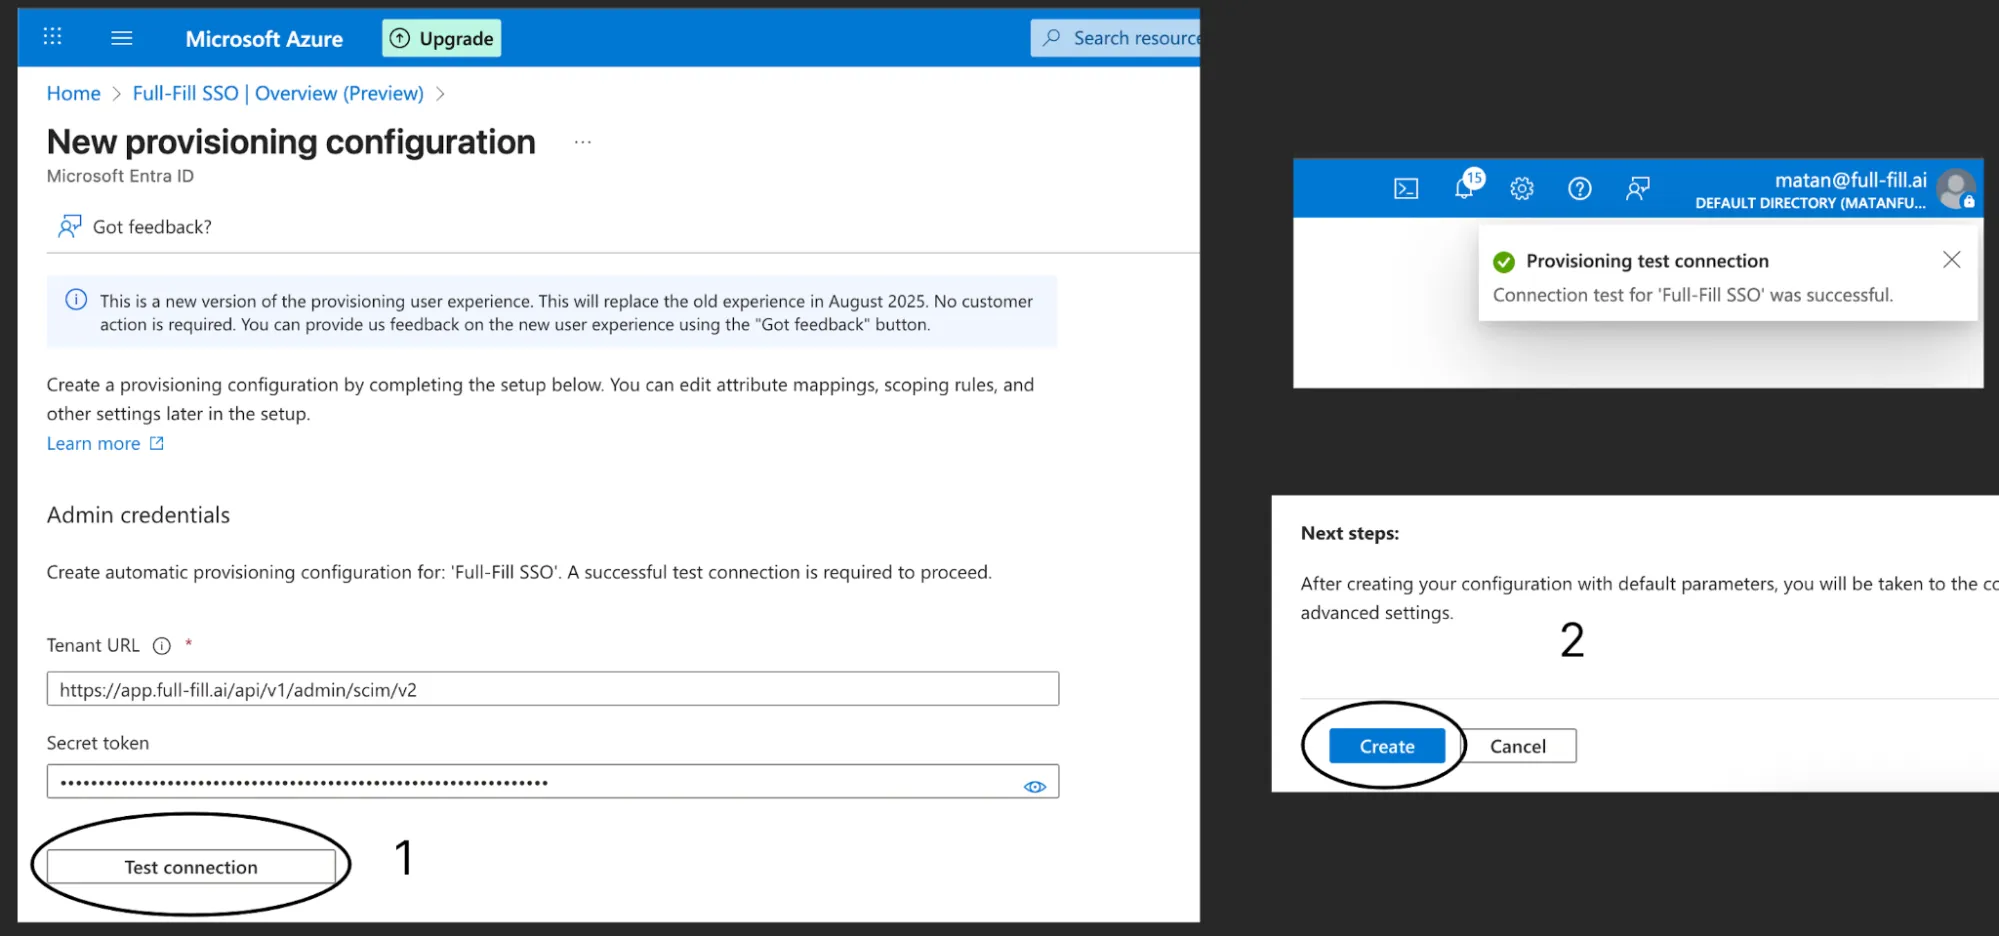
- Set Provisioning Mode to “Automatic”
- In the Admin Credentials section:
- Tenant URL: Paste the SCIM Base URL from Full-Fill
- Secret Token: Paste the Bearer Token from Full-Fill
- Click “Test Connection”
- You should see: ✅ “The supplied credentials are authorized to enable provisioning”
- Click “Save”
Phase 3: Attribute Mapping Configuration
Section titled “Phase 3: Attribute Mapping Configuration”Step 5: Review Attribute Mappings
Section titled “Step 5: Review Attribute Mappings”- Click “Mappings” in the Provisioning page
- Click “Provision Microsoft Entra ID Users”
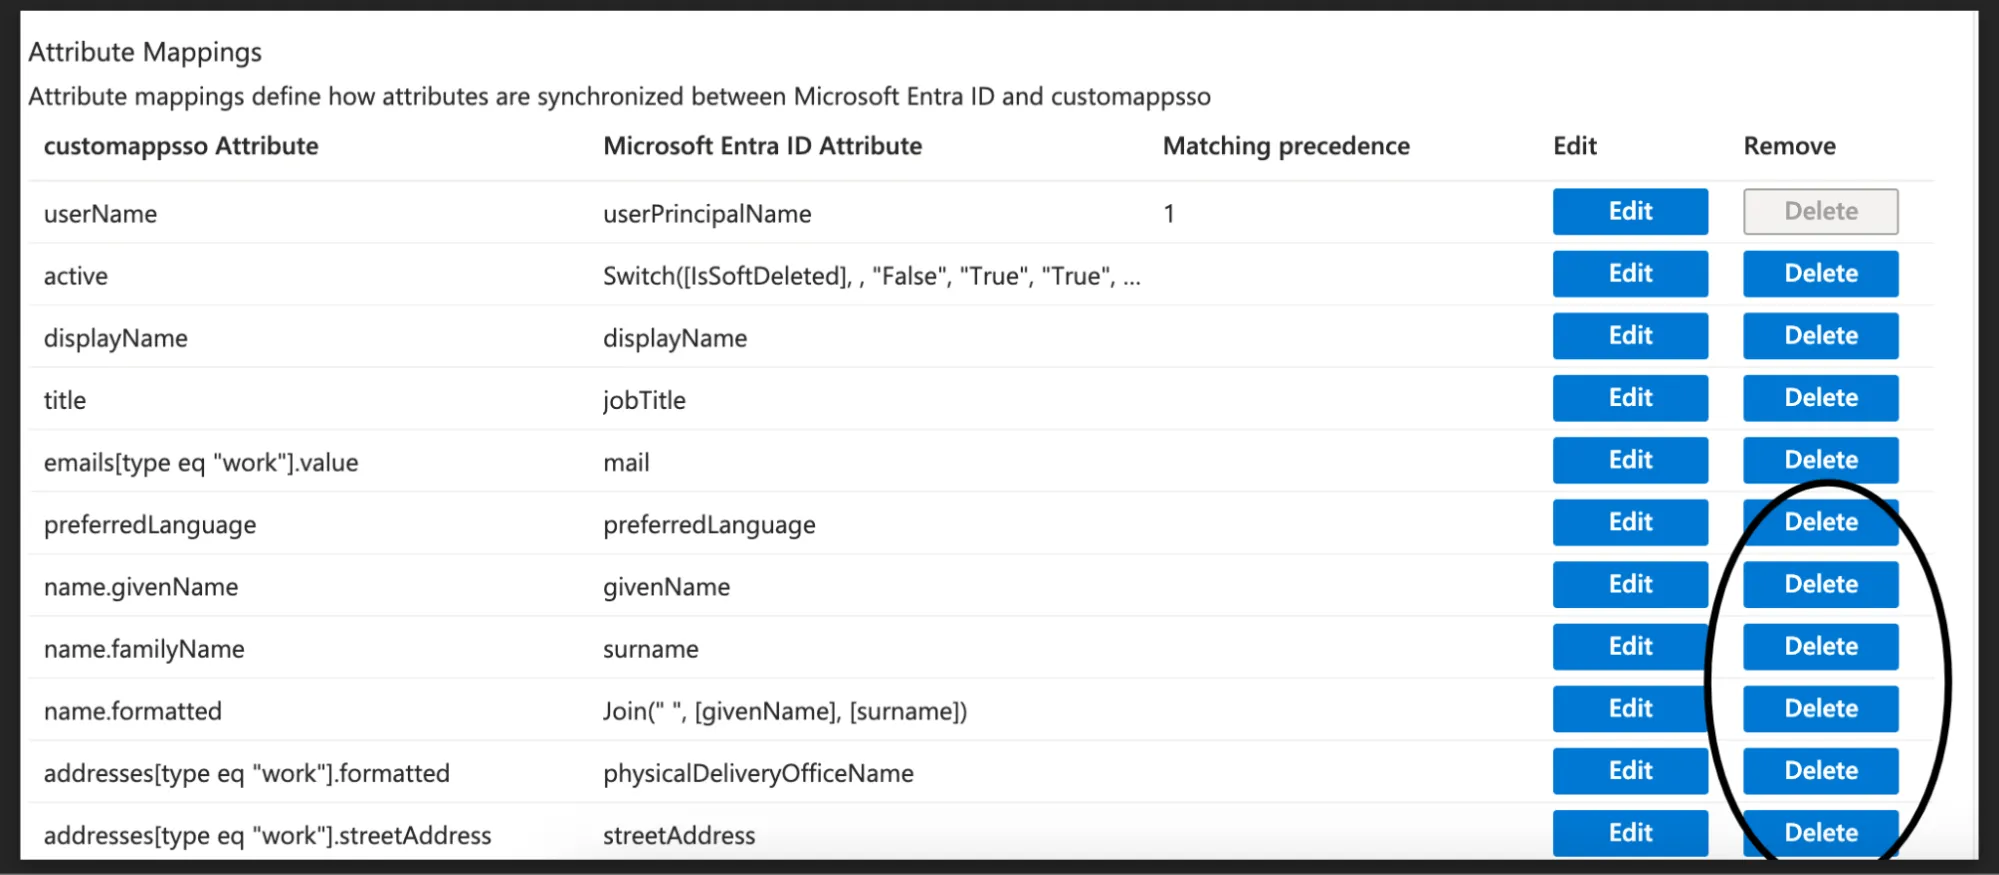
- Review the default mappings:
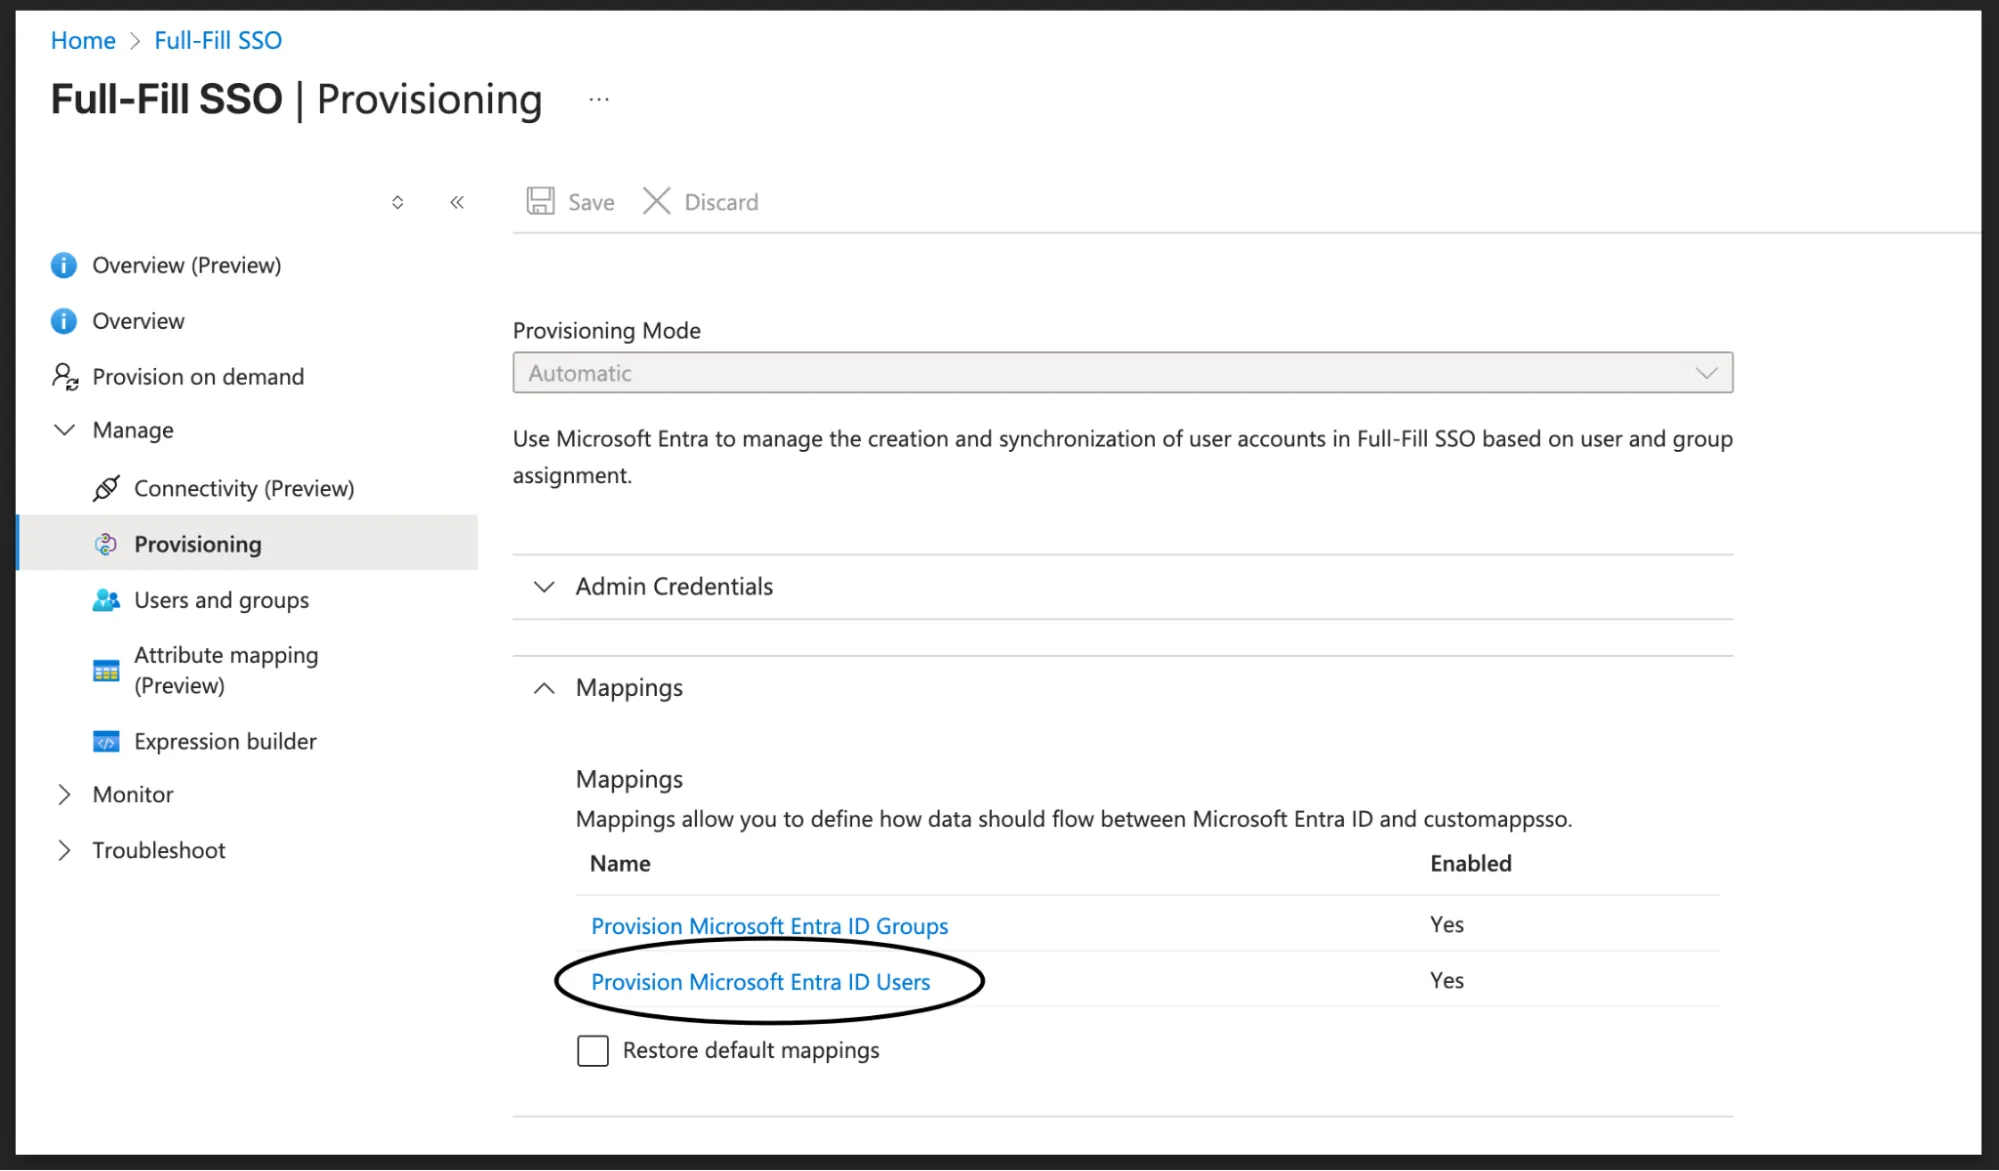
Remove all un-necessary attributes:
Standard Mappings that should remain:
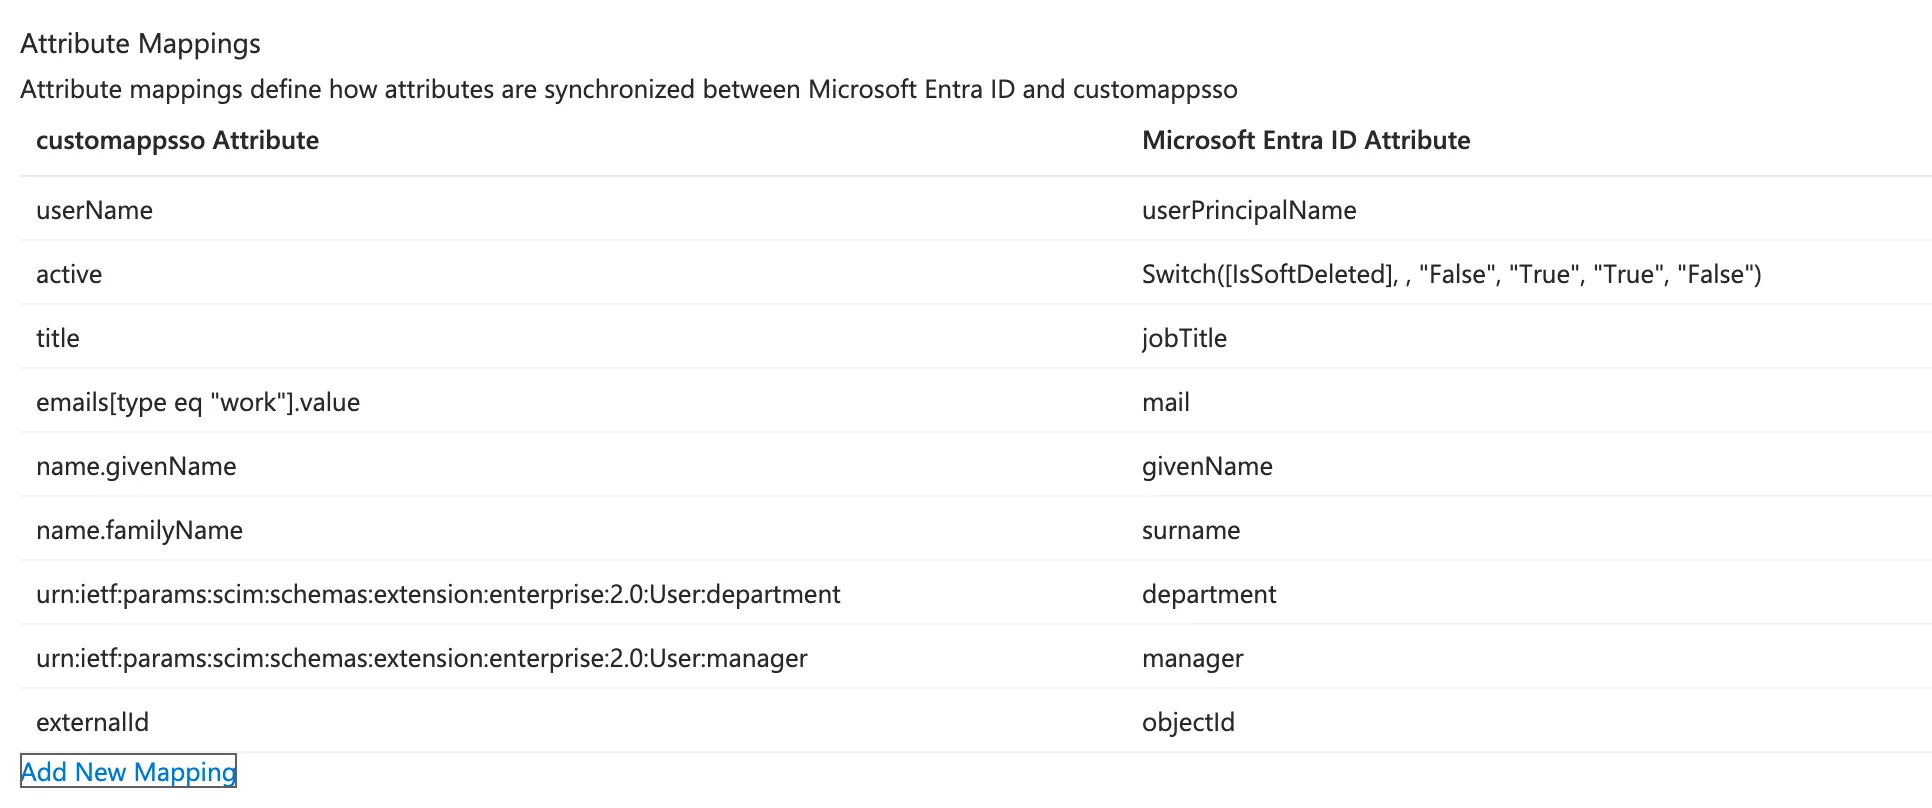
| customappsso Attribute | Microsoft Entra ID Attribute |
|---|---|
| userName | userPrincipalName |
| active | Switch([IsSoftDeleted], , “False”, “True”, “True”, “False”) |
| title | jobTitle |
| emails[type eq “work”].value | |
| name.givenName | givenName |
| name.familyName | surname |
| urn:ietf:params:scim:schemas:extension:enterprise:2.0:User:department | department |
| urn:ietf:params:scim:schemas:extension:enterprise:2.0:User:manager | manager |
| externalId | objectId |
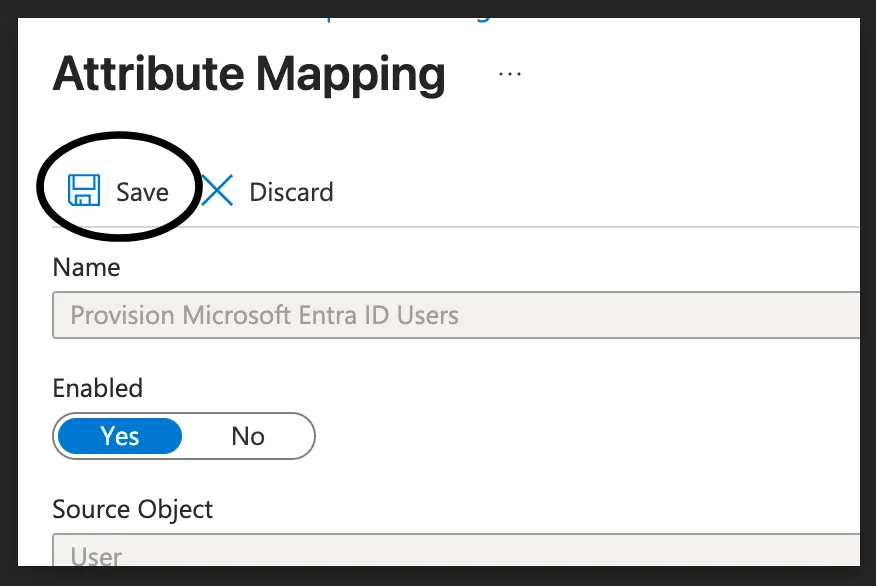
After the attributes are the same as in the table here, click “Save” on top of the page
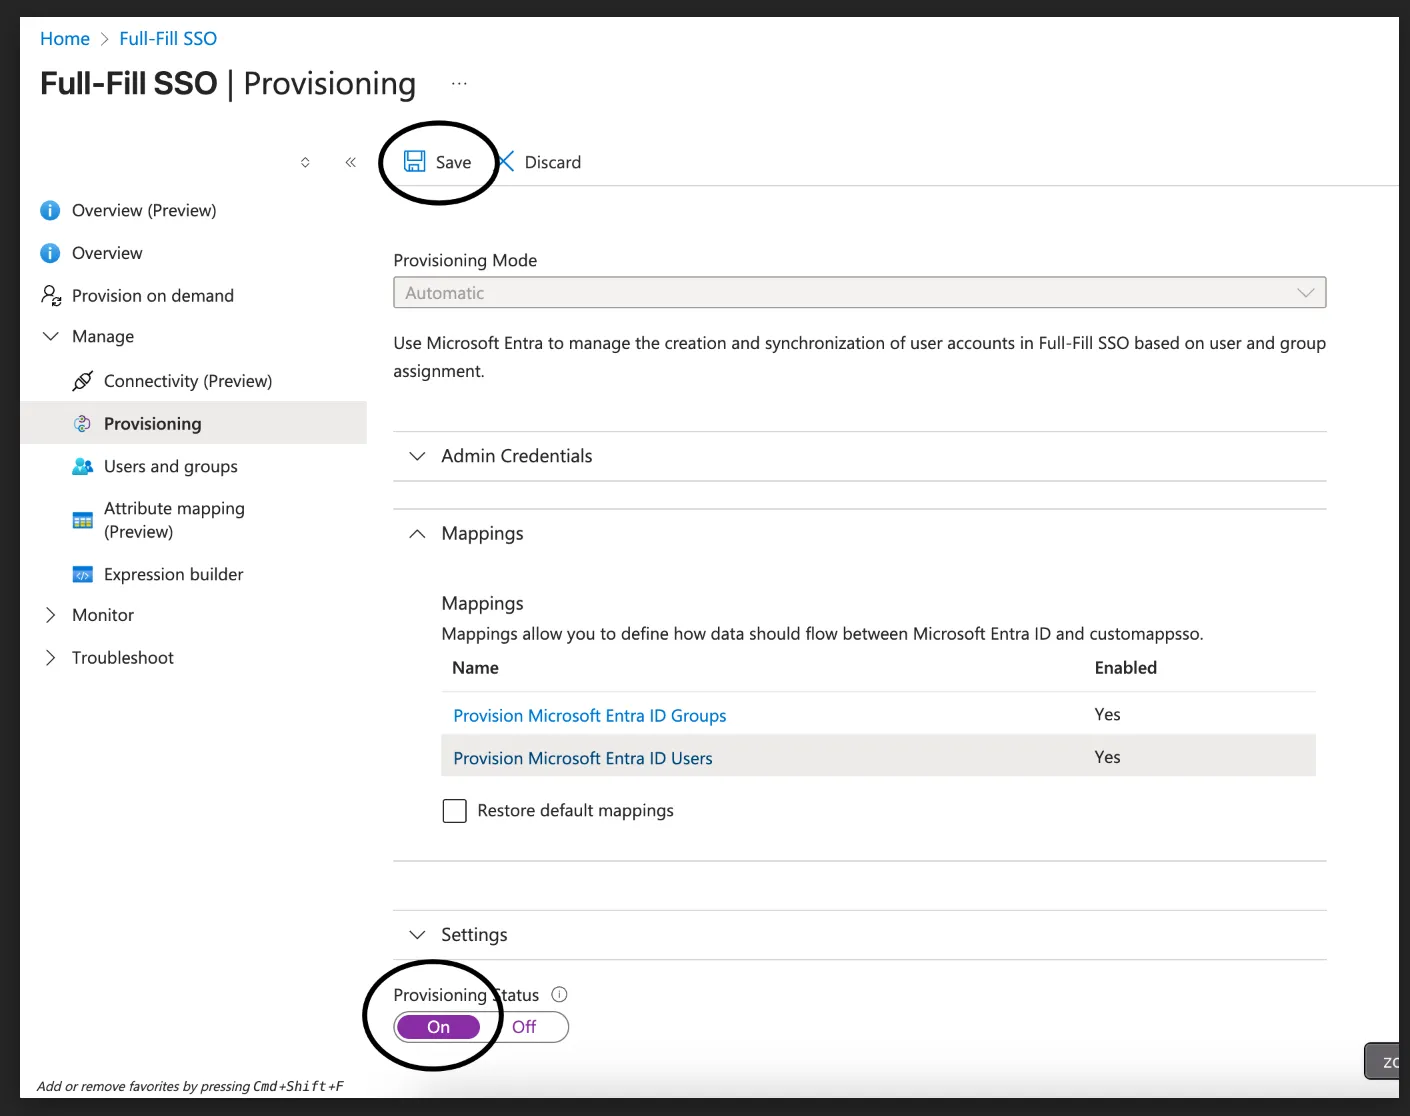
Finally also save the provisioning settings, after setting the provisioning status to “On”
Phase 4: Testing and Activation
Section titled “Phase 4: Testing and Activation”Step 8: Test Provisioning
Section titled “Step 8: Test Provisioning”-
In the Provisioning page, click “Provision on demand”
-
Select a test user from your organization
-
Click “Provision”
-
Verify the process:
- ✅ User should be created in Full-Fill
- ✅ Check Full-Fill user list to confirm
Appendix A - Understanding SCIM Sync Behavior
Section titled “Appendix A - Understanding SCIM Sync Behavior”What Gets Synced Automatically
Section titled “What Gets Synced Automatically”
✅ User Creation:
- When users are assigned to the Azure Enterprise Application
- Creates user account in Full-Fill with ‘active’ status
- Syncs basic profile information (name, email, department)
✅ User Updates:
- Profile changes in Azure AD (name, department, etc.)
- Status changes (enable/disable account)
✅ User Deactivation:
-
When users are unassigned from the Enterprise Application
-
When users are disabled in Azure AD
-
Sets user status to ‘inactive’ in Full-Fill
Sync Frequency
Section titled “Sync Frequency” -
Initial sync: Runs when provisioning is first enabled (~40 minutes)
-
Incremental sync: Runs every 40 minutes automatically
-
On-demand: Can be triggered manually for specific users